السلام عليكم
بوستي اليوم شي بسيط للأظافر.. سهل وايد وياخذ أقل من دقيقتين ونتيجته بتكون أظافر مصبوغة بشكل نظيف ومرتب
وايد مايعجبني المنظر لما بنت صابغة أظافرها واللون يكون حلوو واظافرها متبة.. بس الصبغ نفسه مب نمرتب! يخرب المظهر
هالطريقة تعلمتها من بلوغ الأظافر http://www.lacquerized.com/
Hi All
My post today is a simple Nail Tip.. it's very easy & takes less than 2 minutes, and by doing it you will get a perfectly Polished Nails♥
I don't like seeing a girl wit polished nails, the color is nice & her nails are manicured will but the polish it self is not neat!
I learned this tip a while ago from http://www.lacquerized.com/
هذي الأشياء اللي راح نحتاجها
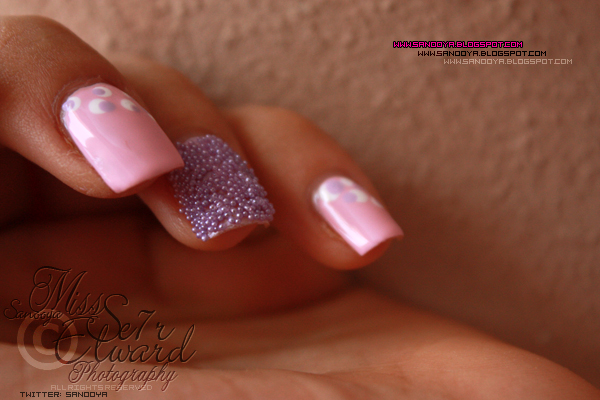
وهني استخدمت زيادة كافيار وردي
والشيئين اللي نحتاجهم للتنظيف واللي هالبوست عنهم
- أسيتون نوعية زينة.. أنا استخدم هالنوع وايد عجيب يمسح اللون من أول مرة وانا دايما اخذ الشفاف اللي بدون ريحة
Here is what will you need:
- your normal nail polishing tools:mine are always: base coat - choosen nail polishes - top coat
& here I used a pink caviar beads as an extra
& the 2 extra things you will need for cleaning:
- a good acetone l nail polish remover, this one is my favorite it removes the color fast; I usually buy the clear unscented one.

- ونحتاج فرشاة ضعيفة.. هالنوع من الفرش يتحصل بكل مكان
ممكن فرشاة آيلاينر قديمة
وممكن تشترون فرشاة آيلاينر من محلات الميكب الرخيصة
أنا شريتها بـ 400 فلس!
وممكن تشترون فرشاة رسم من المكتبات.. أهم شي الفرشاة يكون شعرها ضعيف وشوي يابس وفيها شعر كفاية مب شعرتين!
- a thin brush & this can be found anywhere, you can use an old eyeliner brush, or buy a new one from any cheap brand (I got mine for 400 fils - around $1)m or you can buy a small painting brush from the stationary, it must be thin & little hard with enough bristles (not a bad one with 2 or 3 bristles!)

والحين نبتدي
& Now let's start
أول شي نصبغ الأظافر عادي وننطر لين ينشف البيس كوت
First polish your nails normally & wait until the top coat dries

انا مصورة يدي اليسار واللي عادة الصبغ يكون تقريبا نظيف لأني أصبغ بيدي اليمين تكون الحركة سهلة.. أصابع اليد اليمين عادة يحتاجون تنظيف أكثر.. بس التصوير صعب علشان جذي صورت اليسار.. بس الخطوات نفسها
I took photos of my left hand, the polish is almost perfect before cleaning because it's easy to polish with my right hand, the right hand usually needs more cleaning but it's easier to photograph the left hand, anyways the steps are to be followed for both hands
بعد ماجف الصبغ والتوب كوت.. نغمس الفرشاة في الأسيتون
Now Dip the brush in the acetone

الحين نبتدي التنظيف.. بطرف الفرشاة نمشيها على حواف الظفر جريب الجلد.. ونرد نغمس الفرشة بالاسيتون ونعيدعلى نفس المكان أكثر من مرة بشكل قوس تقريباً.. أو حسب شكل الظفر نفسه ..لين ينظف وتصير نهاية الصبغ قوس مرتب
نكرر نفس العملية لكل ظفر
وبهالطريقة ممكن ننظف حتى الجلد اللي حول وتحت الاظافر
Now Start Cleaning.. move the tip on the brush on the end of your nail near the cuticles, dip it again a move it again like a small arch, or like the normal nail shape until it gets clean and neat
Repeat for Every Nail
& it can be also used to clean around & under the nails


والنتيجة بتكون أظافر مصبوغة بنظافة وترتيب

إن شاء الله تكونون استفدتوا من الطريقة.. مثل ماقلتلكم اهي سهلة وايد بس وايد تحلي الأظافر بعد الصبغ
Hope you liked it, as I told you it's very simple but gives a very neat look to your polished nails
وهذي الخطوات كاملة بصورة وحدة من انستاغرام مالي.. حياكم
& This is all the steps in photo from my Instagram.. Follow Me!

See Yaa
Sanooy♥


![[ BLOGLOIN' ]](https://blogger.googleusercontent.com/img/b/R29vZ2xl/AVvXsEiY2hCQPo30fwI8jVJI4mfwxSM-C78H5PA512Sh-m3Dtro5Pij8UOtU2b03VEzeKiumw84JrJt2BFeuvaJy8aMeUMKMY1jlu_op3sAAG0HVwk-c-BJPUqt5BcnXoavPvj1VmkRx-vbvNqU/s1600/BlogLovin.JPG)


%2B(1).jpg)